Collar Pairing
X30
1. Make sure the controller and collar you want to pair are turned on. Turn off other collars.
2. On the hand device, enter the menu – long press the MENU button.
3. Use the arrows  /
/
 to select Device List and briefly press the
 OK button.
4. Use the arrows /
to choose a free position where you want to pair the collar.
5. Confirm your selection by briefly pressing the OK button.
6. Use the arrows /
to select RF pairing of a nearby device and press the OK button.
7. Wait for the pairing to complete. When finished, a window will appear indicating whether pairing was successful or not.
8. If pairing fails, repeat the process from step 5.
One collar can be paired to multiple controllers.
X40
One collar can only be paired to one controller. If you have multiple X40 collars, you can leave them switched on during pairing. Each collar will only be paired once.
Before pairing the collar, make sure it is in pairing mode. Pairing mode is indicated by the red and green LEDs flashing alternately.
If the collar is not in pairing mode, activate it using the Dogtrace GPS 2.0 mobile app:
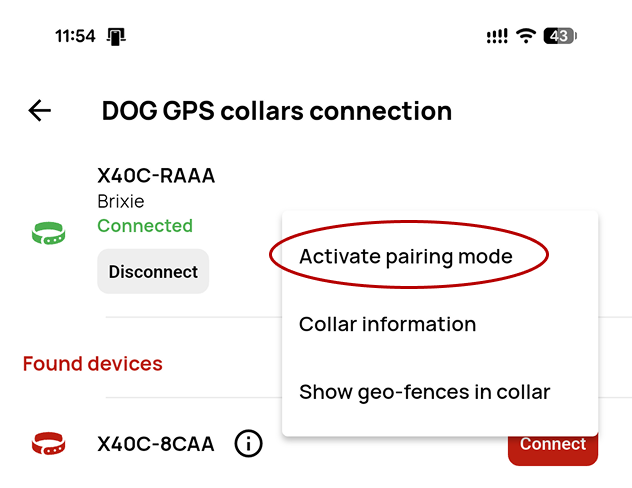
- Menu → Settings → DOG GPS collar connection → Connect to your collar → Tap the three-dot icon → Activate pairing mode
1. Make sure the controller and the collar you want to pair are switched on and that the collar is in pairing mode.
2. On the controller, enter the menu by pressing and holding the MENU button.
3. Use the arrows /
to select Device List and briefly press the OK button.
4. Use the arrows /
to select a free position where you want to pair the collar.
5. Confirm your selection by briefly pressing the OK button.
6. Use the arrows /
to select RF pairing of a nearby device and press the OK button.
7. During pairing, the controller displays which collar is being paired (collar ID). Wait for the pairing to complete. When finished, a window will appear indicating whether the pairing was successful or failed.
8. If pairing fails, repeat the procedure from step 5.